My colleague and I presented at the Lilly Conference (Anaheim, California) this past week. Our talk was on Rethinking Assessment for Agency and Relevance.
We also got to attend others' sessions and have the experience of learning from such tremendous educators from across the country. Unfortunately, California did not deliver much, in terms of the weather…
But, the Lilly Conference certainly delivered.
Five Forms of Becoming a Teacher
Stephen Brookfield gave a talk at the end of the second day of the conference, which he entitled Five Forms of Becoming a Teacher. You can download his text-heavy PowerPoint slides from the workshop materials of his website (under PowerPoint Presentations).
I say that they're text-heavy in the sense that you can probably capture at least some portion of his talk by reading the slides. He framed everything around the principle that no matter how long any of us has been doing this teaching thing, we are still in the process of becoming…
It's hard to wrap my mind around the idea that someone who has written as many books as he has about teaching and who is the definition of expert educator, would still consider himself still becoming…
It was edifying to hear him express this in such a deep, profound way. I've been at this for 13 years and still feel like one who is becoming in each of the areas he discussed.
The five domains that Steve identifies as his areas of becoming are: pedagogically, ontologically, politically, emotionally, and racially.
Racially Becoming
The six bullets that Steve included on the slide related to becoming racially are heavy. I've had a chance to speak with him twice for the Teaching in Higher Ed podcast, plus some conversations before and after those interviews. In particular, we've talked about how we carry our whiteness into diverse classrooms.
Moving beyond the ‘good white person' who is unproblematically an ‘ally' – Stephen Brookfield
I've felt this temptation many times in my teaching. When a student has said something racist in one of my classes, I've observed myself try to hurry the conversation along and try to protect the students of color from what just happened.
Like they don't experience things like that all the time. Like they couldn't speak their own truth, without me having to protect them from someone else's supremacy.
I'm becoming a teacher who thinks less like a ‘good white person' who protects and more like one who has the courage to trust that heated conversations have the potential to ignite changes in perspectives.
Willingness to sit with anger – Stephen Brookfield
Thankfully, I've become far more comfortable sitting with others' anger. However, that seems to sometimes only extend to solo conversations. It is difficult for me to facilitate a group of others who are not equipped to receive others' anger.
So often, conversations about privilege translate into the privileged thinking that because they didn't set out to take others down, that somehow it means that they never could.
I'm becoming a teacher who facilitates hard conversations and helps students be prepared to sit with each others' anger.
Normalizing racism to move past shame and guilt – Stephen Brookfield
I wondered how others in the room during Steve's presentation (especially those who have experienced racism) might feel about the wording of this bullet (here I go, trying to protect others, again…).
What I understood Steve to be referring to was the need to be able to name racism when it occurs and to be able to then do something more powerful with that named action than just leave it at shame and guilt.
If we can name the racist behavior, then we can move toward changing the actions in the future. I'm still wresting with this idea and am not sure where I land. I both want to normalize it and not normalize it, all in the same moment.
I watched as our country normalized the telling of a story about sexual assault from a person who would eventually become the president of the United States. I see too many ‘all lives matter' memes, without any sort of cultural sanctions taking place.
I'm becoming a teacher who discerns how to name racism, without leaving others solely with shame and guilt. I'm becoming a teacher who normalizes the naming of, at the very least, racial microaggressions, to help change minds and actions in the future.
Becoming
I plan on doing some more writing about Steve's other areas of becoming that he spoke about at The Lilly Conference this past weekend. In the meantime, if any of what I've written resonates and you want to explore the topic of racially becoming a bit more, here are some resources.
Teaching in Higher Ed Podcast Episodes
- #142: The Danger of Silence with Clint Smith
- #123: Presumed Incompetent with Yolanda Niemann
- #079: Stereotype Threat with Robin Paige
- #102: Proactive Inclusivity with Carl Moore
- #124: Intercultural Learning with Maha Bali
- #119: Bridging the Culture Gap with Annemarie Perez
- #066: Making Challenging Subjects Fun with Ainissa Ramirez (first ten minutes or so of the episode is about those early influences that led her – as an African American girl – to first become interested in the field of science)
It's hard to write about becoming…. to admit that I'm nowhere done developing into the kind of teacher I yearn to be… Won't you join me in this hard conversation? In what ways are you becoming?


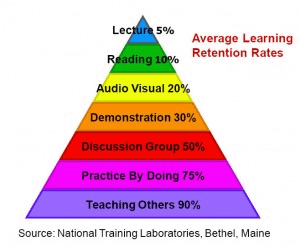 This learning pyramid has also been propagated across multiple educational contexts. It is meant to encourage us to move up as high as we can on the pyramid, lest we leave people only remembering 5% of what we said. This is not to say that there isn't ample research to illustrate the effectiveness of active learning pedagogical approaches, but doesn't the “tidiness” of these numbers make you a bit suspicious?